Photo / Video News & Reviews
Duxy’s Underwater Photography Blog: Available Light, Part 3

Well we are now hopefully aware that to take good available light shots, we need to get close to our subjects, and if they are larger than a typical fish ID pic then we probably need to think about using a wider than normal lens, as explained in the first part of our series here.
And then we need to address the issue of getting blue pictures when what we would like is bright colourful pictures showing the whole range of the spectrum, and this we looked at in part two.
What happens when things don’t work out?
And more importantly, how do we learn to figure what makes a good situation for using available light, or when we still want to shoot with available light but our colours aren’t as good as we would like, despite our best efforts at white balancing?
In an ideal world, all of our available light shots would be taken around half ten in the morning, with the sun behind us, camera pointing very slightly downwards, in about 8 metres of water.
This is an unrealistic expectation though. And of course we can’t possibly guarantee this. It’s helpful to know that Custom White Balance doesn’t always produce the goods.
Folk often get flushed with the success of their early attempts at Custom White Balance, but after the honeymoon period has worn off, they can often become jaded with their results as time passes.
This is for a number of reasons I have found.
First and foremost they have unrealistic expectations of what custom white balance is capable of doing. And this coincides with them becoming more critical underwater photographers as they gain more experience.
To solve the first problem they need to draw on their new found skills and adapt how they shoot available light.
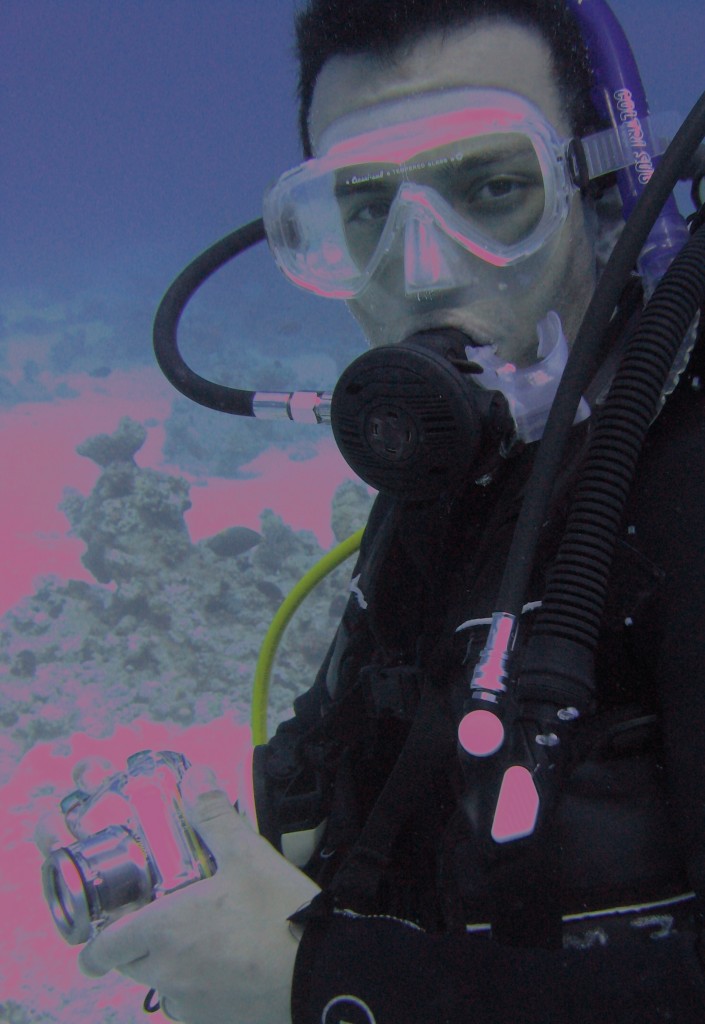
A very common problem is shooting towards the light rather than away from it, and this tends to cause over exposure with an automatic camera, as it tries to expose for the subject occupying the majority of the frame. This then results in the background – either the sand or the surface – taking on a horrible magenta or pink hue.
This is because the colour correction that the custom white balance is introducing is only accurate for the correctly exposed foreground. The background goes like this, as both a combination of overexposure, and also that the surface is shallower requiring less aggressive colour correction. There’s nothing wrong with your camera; it’s just physics working against you.
When it all goes horribly wrong!
If you overly rely on Custom White Balance to sort out your colour problems, you will inevitably end up with shots like this one above. Poor exposure balance and the overexposed background with the sun shining towards you will be marred with a horrible colour cast. This is not a fault of your camera. The camera is only trying to do what you are asking, but it’s the circumstances that are less than ideal.
So, how do you manage this? Well first try where possible to compose and shoot with the sun behind you. And try and shoot slightly downwards using this technique too.
There’s nothing wrong with shooting into the sun – in fact it’s great for silhouettes and dramatic sunbeam pictures that are strobe lit, just not for available light. You just have to teach yourself when it is and isn’t going to work.
Silhouettes
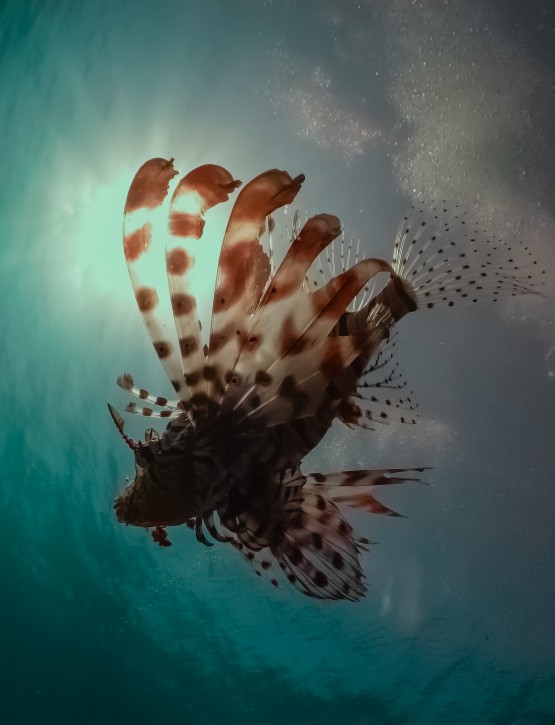
If you are shooting into the sun, then silhouettes are a good example where you have to be very careful when custom white balancing. This shot of a lionfish was taken on a point and shoot Canon camera nearly 8 years ago. I locked my exposure using a half press of the shutter release, whilst pointing at the brightest area, and based my white balance reading not on my hand or the subject, but on the surface water itself. Helping prevent those awful white balance issues shown above.
Another problem with Custom White Balance is that we forget to change it when we change depth, and this becomes more apparent in the shallows, nearer the surface; and our shot is spoiled by the amount of correction applied say at 10m being much too much when we ascend to 5m. So you must remember to get familiar with the procedure and take new readings as you change depth.
Depth Perception
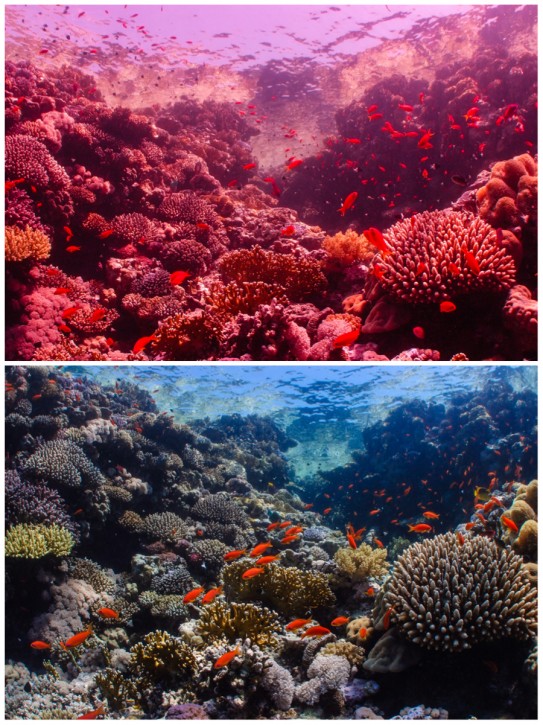
Depth Perception is a common fault when using Custom White Balance, as is forgetting to regularly change your White Balance settings as you change depth. If I didn’t have to already tell you, the shot on the top (above) is the result of taking a picture without white balancing after shooting previously at a greater depth. The shot at the bottom is the same view, but correctly white balanced.
To solve the second most common issue with available light shooting, we also need to draw on our prior experiences.
As we become more capable photographers, starting to get lovely colourful pictures in bright conditions, we need to understand that the camera will lull us into a false sense of security, and the success we see at the shallower depths, i.e. from the surface to around 12m, isn’t as well replicated as we get deeper.
This is because although custom white balance, at least with some camera brands (particularly the Canons) seems to do a remarkable job at ridding us of the blues, it really can’t work magic; and as we get deeper, the colour and amount of light diminishes.
So along with the colours not being as great, what can happen when we go deeper, especially if we are using a fully automatic camera, is that we start to see blur – and camera shake appears.
Who turned out the lights?
Why? Well our eyes and brains are very good at adapting to the steadily diminishing light, and even though it may only look a little darker to us when we go from 10 to 20m, the camera is starting to struggle as the light is much less than we are experiencing.
The trick is to keep an eye on what the camera is telling you; even the most automatic cameras will show you what shutter speed that they are picking, and more importantly, if you are straying into the danger zone, i.e. the shutter speed is too slow to easily hand hold the camera, or that there may be a risk of camera shake or subject movement.
Usually this is a red warning light or a symbol of a shaky hand, or the data or the shutter speed will be highlighted in a warning red colour.
Check in close detail
When we look at the small image on the back of our camera’s screen, at first glance (top pic) everything may seem OK at this small size. However it’s worth zooming into your shot to see if it’s spoilt by camera shake as it clearly is above (bottom pic). Sometimes things may seem bright to us, but they really aren’t as you can see if you zoom into the same shot and see the telltale blurring of camera shake. So don’t assume everything is fine until you look closer.
This can be helped by increasing the ISO settings on our cameras which will force the camera to pick faster shutter speeds and also help reduce the blur in our subjects.
There is a side effect to increasing the ISO though and that’s more grainy or noisy pictures, which looks like this:
Shooting in lower light
Same scene as before, but this time to rid myself of the camera shake I’ve chosen a very high ISO to force the camera into picking a faster shutter speed, thus eliminating the camera shake. Unfortunately though we’ve introduced another problem. And that’s digital noise, which is exacerbated by high ISO’s and low light, and renders the picture virtually unusable as you can see from the enlarged section in the bottom half above.
OK, to be fair I’ve used extremes at either end of the range here to highlight the issues, but once you learn exactly how much, and no more, to raise the ISO’s to give you workable shutter speeds in lots of different scenarios, you are halfway to being able to really get to grips and control your camera in a wide variety of circumstances when available light is your choice (or sometimes only option).
To summarise, try and take your available light Custom white Balanced shots in good light and preferably with the sun behind you. And also be aware that although the camera will let you shoot at lower light levels, the results when you get them back on your computer may be spoilt by camera shake and subject movement, so increase the ISO or take your shot shallower if possible.
So in part 4, I will be looking at other ways to colour correct your pictures, and options you may have but not realise, along with examples of what to do when you can’t colour correct things properly.
[hr style=”single”]
 Duxy is the in house photo-pro for UK-based dive tour operator Scuba Travel. To find out about availability on Scuba Travel’s underwater photography workshops hosted by Duxy click here.
News
Meet Insta360 Ace Pro 2: Redefining Action Cameras With Unrivaled 8K Image Quality & Smarter AI

Insta360 is thrilled to announce the latest addition to its Ace series, Insta360 Ace Pro 2. This groundbreaking wide-angle action camera delivers unparalleled image quality, smarter, easier capture powered by AI, upgraded audio, and an improved rugged design made for action at its most extreme.
Co-engineered with Leica, it delivers serious performance upgrades with the industry-first dual AI chip and state-of-the-art imaging courtesy of a new 1/1.3″ 8K sensor and Leica SUMMARIT lens with a 157º field of view. Creators can experience smoother videos with higher frame rates at 8K30fps and 4K60fps Active HDR, PureVideo for excellent low light performance, a bigger 2.5″ flip touchscreen and more.
The action camera utilizes Insta360’s advanced AI technology to offer a smarter experience from shooting to sharing. Innovative functions like the option to pause or cancel a recording, gesture and voice control, Auto Edit, and AI Highlights Assistant completely transform the experience for creators. With no more complex workflows, anyone can experience a simpler way to film and spend more time immersed in the moments they love.

Insta360 Ace Pro 2 significantly improves on its design, offering a more rugged, reliable action camera. Its waterproofing has increased to 39ft (12m), and it offers crystal-clear audio with an integrated Wind Guard and a removable Lens Guard to handle whatever you throw at it, providing full flexibility for action and sports enthusiasts.
“Our goal was to refine and enhance the groundbreaking features of the original Insta360 Ace Pro to deliver an unparalleled experience,” says JK Liu, founder of Insta360. “We are confident these upgrades establish a new industry standard. Not only do they bring significant advances in AI, they empower creators to capture what was always impossible with other action cameras, opening the door to unprecedented creative potential.”
Insta360 Ace Pro 2 is available to order today worldwide via Insta360.com, as well as trusted retailers and select authorized partners.
Unparalleled Image Quality, Day and Night
The Leica SUMMARIT lens immediately sets it apart from competitors with its state-of-the-art image quality. Combined with an upgraded 1/1.3″ 8K sensor offering 13.5 stops of dynamic range, Insta360 Ace Pro 2 delivers simply breathtaking visuals in situations other action cameras simply can’t handle.
Further contributing to its image quality and performance is the industry-leading dual-chip design. Insta360 Ace Pro 2 is the first action camera with a dedicated Pro Imaging Chip that handles image processing and noise reduction, while a separate 5nm AI Chip handles further image processing and overall camera performance, providing a smooth, seamless user experience. The dual chip also enables more shooting modes and higher specifications, such as 8K30fps video, 4K60fps Active HDR (High Dynamic Range), and upgraded PureVideo. Even in fast-moving motion and high-intensity action, creators can enjoy smooth, sharp videos thanks to the higher frame rates or slow it all the way down with crisp 4K120fps slow motion.
A complex, custom-trained AI neural network underpins PureVideo, a specialized shooting mode that drastically reduces noise and enhances details in real time for cleaner, brighter images, even in extreme low light. Whether it’s twilight strolls or evening rides, creators can record what they never could before. For the daytime, upgraded 4K60fps Active HDR brings out all the details in intense highlights and shadows for more vibrant footage. Meanwhile, a wider 157° lens FOV captures more of the surroundings, perfect for vlogging or when the scenery really matters.
Exclusive Leica-engineered color profiles infuse footage with their signature aesthetic, adding a touch of elegance to every shot. Insta360’s devotion to color accuracy is seen elsewhere with Insta360 Ace Pro 2’s ability to retain rich and precise colors, even underwater.
Ready for Action Anytime, Anywhere
The upgraded design proves to be even more rugged, ready for when you ramp up the action. Waterproofing has increased to 39 feet (12 meters) or 197 feet (60 meters) with the Dive Case, and it handles temperatures as low as -4ºF (-20ºC) with ease, perfect for winter sports and extreme climates.
The new, removable Lens Guard provides greater all-around protection, meaning creators can feel confident to push the limits further and capture the impossible, knowing their action cam is up to the challenge.
An all-new Wind Guard keeps wind and noise at a minimum during those peak moments, ready to snap on and off as you need. With refreshed audio algorithms bringing professional-grade clarity to your content, you can immerse your viewers like never before. What’s more, the magnetic mounting system lets you seamlessly switch between accessories. Less time spent unscrewing and screwing your camera and mounts, more time in the moment.
Insta360’s leading FlowState Stabilization technology ensures videos remain incredibly smooth no matter what, while 360º Horizon Lock, now applied automatically in-camera, keeps everything perfectly level. Prioritizing performance and convenience, Insta360 Ace Pro 2 sports a bigger 1800mAh battery and a new Endurance Mode that offers a 50% longer runtime at 4K30fps than Insta360 Ace Pro. Fast charging powers the battery to 80% in 18 minutes or 100% in 47 minutes, so you can get back to the action quicker.
Insta360 has expanded its compatibility with several top third-party sports accessories, allowing action and sports enthusiasts to add a new level of detail. For data-rich videos, overlay real-time stats from third-party sports brands, including Garmin, Apple, COROS, and more. Alternatively, users can add stats from their phone directly in the Insta360 app without any extra gear or use the GPS Preview Remote for easy live preview, remote control, and real-time GPS data. For moto vloggers, pair Insta360 Ace Pro 2 with your motorcycle helmet headset from Sena, Cardo, and more for clear dual-track audio and hands-free control every ride.
Made for those who demand the highest standard of action capture, Insta360 Ace Pro 2 offers the perfect combination of durability and high-quality performance to capture life’s thrills with confidence.

Smarter, Easier Capture & Editing
Insta360 Ace Pro’s flip touchscreen proved an essential and convenient tool for creators and has been further upgraded to 2.5 inches. With a 70% increase in pixel density, a 6% increase in brightness and a 100% increase in flip durability, it allows for perfect framing and easier preview for vlogging, selfies, and difficult angles, all while remaining visible under bright sunlight. Instead of guessing if your shot looks perfect, you can shoot with confidence, knowing it is.
Internally, Insta360 Ace Pro 2 offers innovative solutions to problems that have hindered action enthusiasts for years:
- 4K Clarity Zoom – Want a close-up but the image quality becomes too grainy? Zoom in and out 2x without losing quality.
- Pre-Recording – Never miss a moment with up to 120 seconds of footage saved before you even hit record.
- Gesture & Voice Control – Use quick hand signals or verbal commands to control the camera, such as start/stop recording or take a photo, ideal if it’s mounted out of reach.
- Pause/Resume Recording – Got time between shots? Hit pause and continue recording when you need to keep everything in one continuous file for easier file management and editing.
- Timecode – Seamlessly synchronizes multiple cameras for an efficient editing workflow.
Insta360’s revolutionary AI features demonstrate a commitment to making shooting and editing as accessible as possible. Anyone, regardless of their skill level, will be amazed at what they can create. For those who aren’t confident editing, AI Highlights Assistant automatically finds the best moments from a video and delivers the highlights for review, all in-camera. Creators can merge every thrilling moment into one incredible recap or choose the ones their favorites and delete any unwanted clips to save storage.
The Assistant also helps craft your next reel from your adventures and pushes it directly to your smartphone via the Insta360 app. Look back on all your Memories and share those unforgettable moments in seconds.
Acting as a full editing suite in your pocket, the Insta360 mobile app fully embraces the game-changing possibilities of AI with advanced Auto Editing, one-tap templates and creative Shot Lab effects. Instead of spending hours learning complex tools and editing workflows, AI does it all for you, bringing your clips to life with dynamic cuts and transitions. Creators can even achieve the infamous Invisible Selfie Stick effect with the AI Selfie Stick Eraser in the app for third-person views. Looking for a real twist? AI Warp uses preset or custom keywords to bring your wildest ideas to life.
Available Now
Insta360 Ace Pro 2 is available to purchase today worldwide via Insta360.com and select retailers. The Standard Bundle retails for US$399.99 and includes a Wind Guard, Battery, Standard Mount, Mic Cap, and USB-C Cable. The dual battery bundle includes the same accessories and two batteries for US$419.99.
News
Introducing the Nauticam Super Macro Converter 3

The SMC-3
Nauticam is proud to introduce the SMC-3, the latest evolution in our line of water contact optics! Designed as a renewed version of the acclaimed SMC-1, the SMC-3 boasts a lightweight build—now only one-third the weight of its predecessor—without compromising on optical performance.
SMC-3 Specifications
| Dimensions | OD 70mm x H 32mm |
| Weight in Air | 307g |
| Weight in Water | 215g |
| Max Magnification (*1) | 2.4x (lens dependent) |
| Working Distance (*1) | 51-103mm |
| Lens Construction | 3 elements in 2 groups |
| Lens Coatings | Anti-reflection Coating |
| Mount Thread Diameter | M67 |
| Depth Rating |
100mm |

Tested with Nikon AF-S VR Micro-Nikkor 105mm f/2.8G IF-ED
Key Features
- Ultra-Lightweight Design: Weighing in at just one-third of the SMC-1, the SMC-3 offers unparalleled portability for on-the-go use.
- Superior Optical Performance: Enjoy the same exceptional clarity and precision you’ve come to expect from the SMC series.
- Increased Working Distance: The redesigned lens allows for a greater working distance, meaning it’s easier to use and provides enhanced versatility.
- Premium Materials: Crafted with advanced materials to enhance durability while minimizing weight.
- Cost-Effective: Slightly more affordable than the discontinued SMC-1, the SMC-3 delivers exceptional value.
Uncompromised Optical Quality
The Super Macro Converter 3 is constructed from lenses that are precision crafted of specially formulated low dispersion optical grade glass, ground to the most demanding standards. These exceptional measures, enhanced by broadband anti-refective coatings effectively reduce common optical issues such as chromatic aberrations, coma, spherical aberration, and field deformation associated with underwater macro photography using traditional magnifying lenses. These optics are assembled in a rugged hard anodized aluminum housing, and nitrogen purged during assembly to eliminate fogging.
Stunning Magnification
When combined with a full frame camera and a 100mm or 105mm macro lens, the device converts the optical system to provide a maximum of 2.4X magnification factor. In other words, a subject area of 15.6mm X 10.4mm will fill the whole frame of a 36mm X 24mm sensor.
Improved Sharpness and Contrast
As the Super Macro Converter 3 is optimized explicitly for using together with a macro lens underwater, images captured exhibit exceptional sharpness compared with conventional magnification lenses. Thanks to the broadband multi-layer anti-reflection coating on each surface of the lenses, images also exhibit higher contrast.
Superb Light Transmission
All the lens elements installed inside the SMC are optically optimized to appropriate diameters so as to provide maximum light transmission. The SMC doesn’t suffer from vignette issues under even the most extreme conditions. The broad band multi-layer anti-reflection coating on all surfaces also greatly improves light transmission.
Optimized for Autofocus
By utilizing a specially developed algorithm in the optimization process, the SMC renders superior image quality over the full focusing range of the camera lens (which becomes ~50 to ~100 mm in front of the SMC). Also benefitting from the high brightness and contrast of the image, the autofocus system of the camera usually works acceptably well within this range.

Ample Working Distance
Even at the maximum 2.3X magnification, there is still more than 50mm of working distance between the front element and the subject with 100/105mm macro lenses. This working distance is crucial when capturing behavior with skittish subjects.
Resolution
High resolution was a primary design goal of the SMC project. This has been achieved using computer aided optimization and high grade optical glasses with unique refractive and dispersion properties. Images taken with this new system exhibit very high resolution and quality. Results have exceeded expectations, and these images rival the quality of the macro lens in air.
Smooth Bokeh
The Converter retains the optical properties of the macro lens for the whole system underwater, resulting in a blurred (out of focus) background that has a pleasing smoothness and creamy look, without the normal purple and green fringing.
Avoiding Diffraction
Due to the overall superior optical performance of the SMC-3 it is possible to shoot larger apertures with excellent image quality. This avoids reaching the diffraction limit of high resolution sensors, and allows selective focus effects with narrow depth of field in super macro images.
For more information about the Nauticam Super Macro Converter 3, which ships in November, click here.
-

 News1 month ago
Iconic SS United States to become the World’s Largest Artificial Reef
-

 Blogs3 months ago
NovoScuba’s Game-Changing Approach for Dive Store Owners: WE PAY YOU!
-

 News2 months ago
Book Review – 52 Assignments: Underwater Photography
-

 Gear News2 months ago
DYNAMICNORD – New German diving brand enters the British market
-

 News2 months ago
Exploring Cenote El Pit: A Diver’s Dream
-

 Gear News2 months ago
Try BARE drysuits (and maybe even win one!) this Friday with Sea & Sea at North West Dive Fest
-

 News3 months ago
Coming Soon – 52 Assignments
-

 News3 months ago
Save £200 per person per week at Pole Pole Lodge with Dive Worldwide


