News
Duxy’s Underwater Photography Blog: Available Light, Part 3
Well we are now hopefully aware that to take good available light shots, we need to get close to our subjects, and if they are larger than a typical fish ID pic then we probably need to think about using a wider than normal lens, as explained in the first part of our series here.
And then we need to address the issue of getting blue pictures when what we would like is bright colourful pictures showing the whole range of the spectrum, and this we looked at in part two.
What happens when things don’t work out?
And more importantly, how do we learn to figure what makes a good situation for using available light, or when we still want to shoot with available light but our colours aren’t as good as we would like, despite our best efforts at white balancing?
In an ideal world, all of our available light shots would be taken around half ten in the morning, with the sun behind us, camera pointing very slightly downwards, in about 8 metres of water.
This is an unrealistic expectation though. And of course we can’t possibly guarantee this. It’s helpful to know that Custom White Balance doesn’t always produce the goods.
Folk often get flushed with the success of their early attempts at Custom White Balance, but after the honeymoon period has worn off, they can often become jaded with their results as time passes.
This is for a number of reasons I have found.
First and foremost they have unrealistic expectations of what custom white balance is capable of doing. And this coincides with them becoming more critical underwater photographers as they gain more experience.
To solve the first problem they need to draw on their new found skills and adapt how they shoot available light.
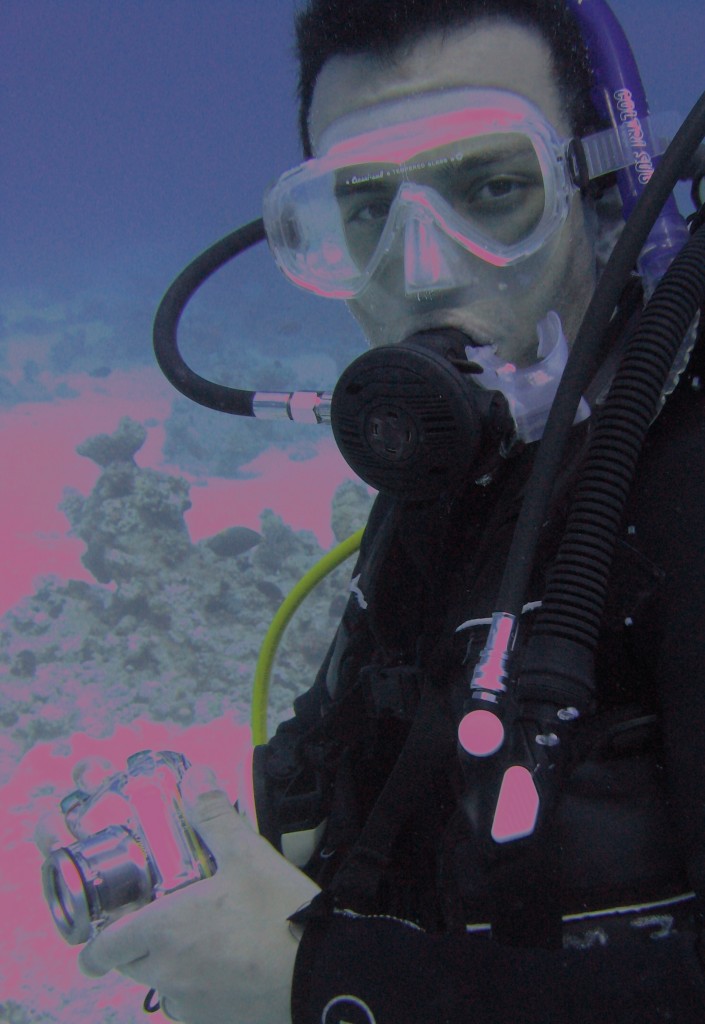
A very common problem is shooting towards the light rather than away from it, and this tends to cause over exposure with an automatic camera, as it tries to expose for the subject occupying the majority of the frame. This then results in the background – either the sand or the surface – taking on a horrible magenta or pink hue.
This is because the colour correction that the custom white balance is introducing is only accurate for the correctly exposed foreground. The background goes like this, as both a combination of overexposure, and also that the surface is shallower requiring less aggressive colour correction. There’s nothing wrong with your camera; it’s just physics working against you.
When it all goes horribly wrong!
If you overly rely on Custom White Balance to sort out your colour problems, you will inevitably end up with shots like this one above. Poor exposure balance and the overexposed background with the sun shining towards you will be marred with a horrible colour cast. This is not a fault of your camera. The camera is only trying to do what you are asking, but it’s the circumstances that are less than ideal.
So, how do you manage this? Well first try where possible to compose and shoot with the sun behind you. And try and shoot slightly downwards using this technique too.
There’s nothing wrong with shooting into the sun – in fact it’s great for silhouettes and dramatic sunbeam pictures that are strobe lit, just not for available light. You just have to teach yourself when it is and isn’t going to work.
Silhouettes
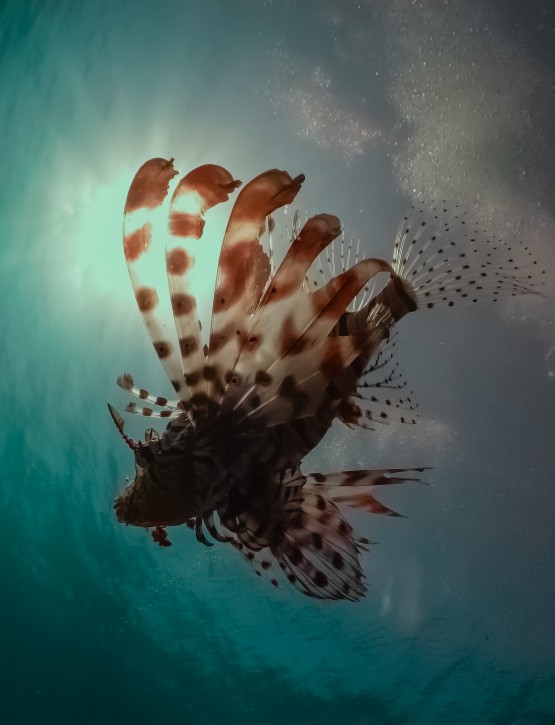
If you are shooting into the sun, then silhouettes are a good example where you have to be very careful when custom white balancing. This shot of a lionfish was taken on a point and shoot Canon camera nearly 8 years ago. I locked my exposure using a half press of the shutter release, whilst pointing at the brightest area, and based my white balance reading not on my hand or the subject, but on the surface water itself. Helping prevent those awful white balance issues shown above.
Another problem with Custom White Balance is that we forget to change it when we change depth, and this becomes more apparent in the shallows, nearer the surface; and our shot is spoiled by the amount of correction applied say at 10m being much too much when we ascend to 5m. So you must remember to get familiar with the procedure and take new readings as you change depth.
Depth Perception
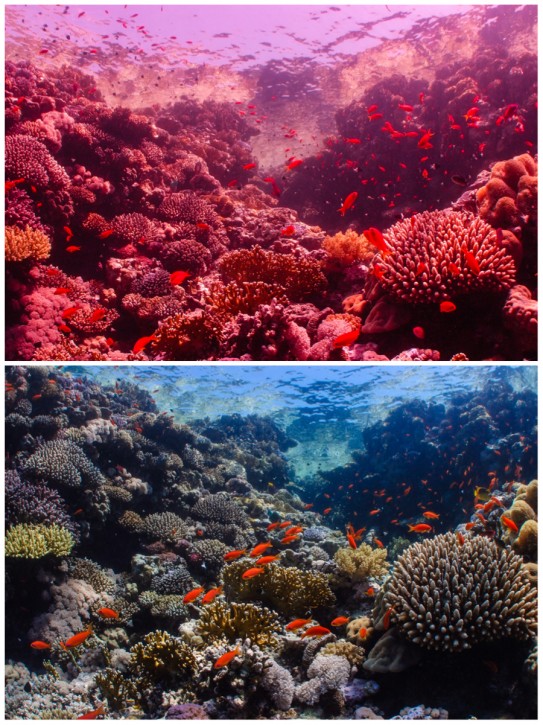
Depth Perception is a common fault when using Custom White Balance, as is forgetting to regularly change your White Balance settings as you change depth. If I didn’t have to already tell you, the shot on the top (above) is the result of taking a picture without white balancing after shooting previously at a greater depth. The shot at the bottom is the same view, but correctly white balanced.
To solve the second most common issue with available light shooting, we also need to draw on our prior experiences.
As we become more capable photographers, starting to get lovely colourful pictures in bright conditions, we need to understand that the camera will lull us into a false sense of security, and the success we see at the shallower depths, i.e. from the surface to around 12m, isn’t as well replicated as we get deeper.
This is because although custom white balance, at least with some camera brands (particularly the Canons) seems to do a remarkable job at ridding us of the blues, it really can’t work magic; and as we get deeper, the colour and amount of light diminishes.
So along with the colours not being as great, what can happen when we go deeper, especially if we are using a fully automatic camera, is that we start to see blur – and camera shake appears.
Who turned out the lights?
Why? Well our eyes and brains are very good at adapting to the steadily diminishing light, and even though it may only look a little darker to us when we go from 10 to 20m, the camera is starting to struggle as the light is much less than we are experiencing.
The trick is to keep an eye on what the camera is telling you; even the most automatic cameras will show you what shutter speed that they are picking, and more importantly, if you are straying into the danger zone, i.e. the shutter speed is too slow to easily hand hold the camera, or that there may be a risk of camera shake or subject movement.
Usually this is a red warning light or a symbol of a shaky hand, or the data or the shutter speed will be highlighted in a warning red colour.
Check in close detail
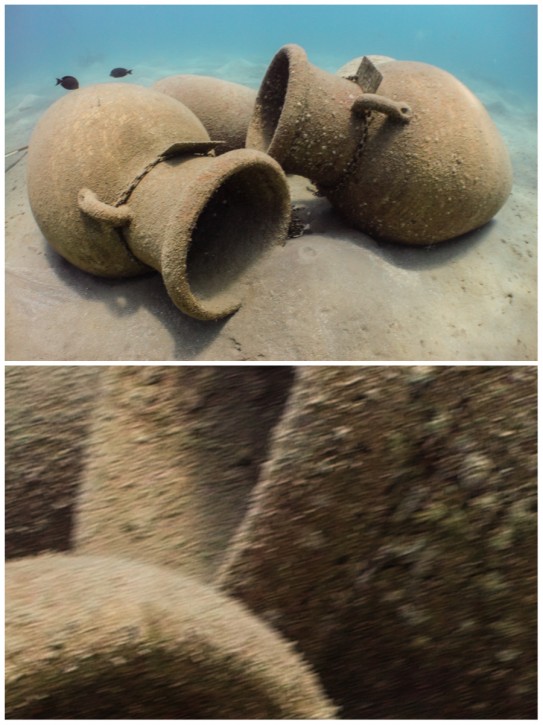
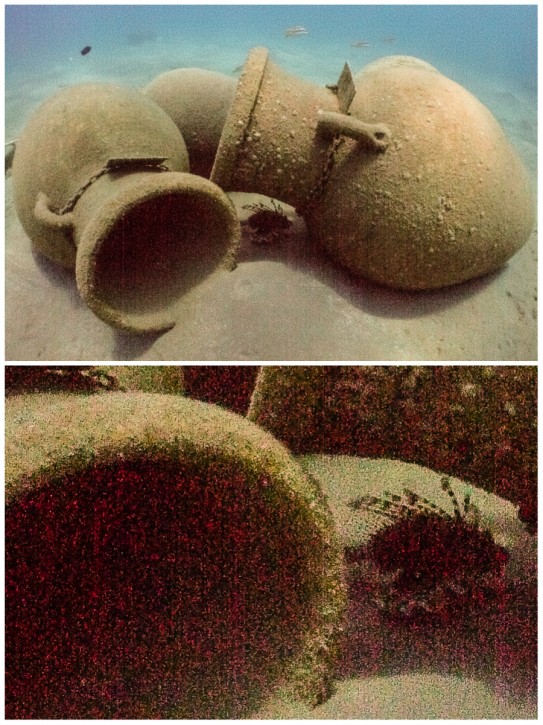
When we look at the small image on the back of our camera’s screen, at first glance (top pic) everything may seem OK at this small size. However it’s worth zooming into your shot to see if it’s spoilt by camera shake as it clearly is above (bottom pic). Sometimes things may seem bright to us, but they really aren’t as you can see if you zoom into the same shot and see the telltale blurring of camera shake. So don’t assume everything is fine until you look closer.
This can be helped by increasing the ISO settings on our cameras which will force the camera to pick faster shutter speeds and also help reduce the blur in our subjects.
There is a side effect to increasing the ISO though and that’s more grainy or noisy pictures, which looks like this:
Shooting in lower light
Same scene as before, but this time to rid myself of the camera shake I’ve chosen a very high ISO to force the camera into picking a faster shutter speed, thus eliminating the camera shake. Unfortunately though we’ve introduced another problem. And that’s digital noise, which is exacerbated by high ISO’s and low light, and renders the picture virtually unusable as you can see from the enlarged section in the bottom half above.
OK, to be fair I’ve used extremes at either end of the range here to highlight the issues, but once you learn exactly how much, and no more, to raise the ISO’s to give you workable shutter speeds in lots of different scenarios, you are halfway to being able to really get to grips and control your camera in a wide variety of circumstances when available light is your choice (or sometimes only option).
To summarise, try and take your available light Custom white Balanced shots in good light and preferably with the sun behind you. And also be aware that although the camera will let you shoot at lower light levels, the results when you get them back on your computer may be spoilt by camera shake and subject movement, so increase the ISO or take your shot shallower if possible.
So in part 4, I will be looking at other ways to colour correct your pictures, and options you may have but not realise, along with examples of what to do when you can’t colour correct things properly.
[hr style=”single”]
 Duxy is the in house photo-pro for UK-based dive tour operator Scuba Travel. To find out about availability on Scuba Travel’s underwater photography workshops hosted by Duxy click here.
News
Santa Divers take the Plunge for Charity

Ho Ho Ho! Vobster Quay’s recording-breaking charity Santa diving event returns on Sunday 15th December 2024 for another round of festive fundraising frivolities. Run in aid of the Royal National Lifeboat Institution (RNLI) and Help For Heroes, this ever-popular annual fundraising event aims to raise sack-loads of cash for these two very deserving charities.
Divers of all levels are invited to grab their Santa outfits – and as much festive cheer as they can muster – and head down to Vobster Quay near Mells, Somerset for a mass sponsored Santa dive in aid of charity. In previous years, the event has attracted divers from the far corners of the UK to join in the festive merriment for a final festive dive before the Christmas and New Year break. Back in 2015, the event smashed the world record for the most Santa divers with 188 divers taking to the waters donning their festive finery – a record that remains unbeaten to this day!

Vobster Santas isn’t just about setting records – it’s also about raising some serious cash for charity. Vobster Quay encourages all divers to get into the spirit of the season to raise much-needed funds for two very deserving charities – the Royal National Lifeboat Institution (RNLI) and Help For Heroes.
Through individual sponsorship and online donations, divers can invite their friends, family and work colleagues to sponsor them to plunge into the balmy waters of Vobster Quay dressed in full festive finery. Since the very first Santa dive in 2007, the event has raised over £52,000 for charity. “It’s been over 17 years since the very first charity Santa dive took place at Vobster Quay and every year the event just keeps getting bigger and better” enthused Vobster Quay owner, Amy Stanton.
“Vobster Santas is a great way for divers to say a massive thank you to the both the RNLI and Help For Heroes – two very deserving charities close to our hearts. We’re immensely proud of all that Vobster Santas has achieved and hope that even more divers will join this year’s event on Sunday 15th December. I’m confident that we can make Vobster Santas 2024 the biggest yet!”.
Divers wishing to participate can get involved by simply registering their attendance at
www.vobster.com/event-vobstersantas.php.

Blogs
Dive into Adventure at Hideaway Beach Resort & Spa: The Ultimate Diving Destination in the Maldives

Tucked away in the remote northern Haa Alifu Atoll, Hideaway Beach Resort & Spa is a premier destination for anyone seeking an unforgettable underwater experience. With over 30 dive sites to explore, divers of all levels can witness the unique and mesmerising beauty of the underwater world. Whether you’re a seasoned diver or new to the sport, Hideaway offers an exceptional diving adventure that is not to be missed.

Explore the Beauty Beneath the Surface
Hideaway is perfectly situated near some of the most spectacular dive sites in the Maldives. The dive school and team at Hideaway offer a very personalised experience to ensure each diver gets an interactive, immersive experience.

Email: reservations@hideawaybeachmaldives.com / Call: +960 650-1515 / Website: www.hideawaybeachmaldives.com
Unique dive spots such as Theefaridhoo Thila (Heaven and Hell) as one of the 50 best dive sites in the whole of the Maldives, known for its beautiful soft coral gardens.

Email: reservations@hideawaybeachmaldives.com / Call: +960 650-1515 / Website: www.hideawaybeachmaldives.com
As the resort is located next to a channel which gives guests surprise visits from eagle rays, manta rays, guitar sharks and more.

Email: reservations@hideawaybeachmaldives.com / Call: +960 650-1515 / Website: www.hideawaybeachmaldives.com
One of the standout features of diving in the Haa Alifu Atoll is the abundance of rare and exotic marine species. The area is known for sightings of whale sharks, manta rays, turtles, and a variety of colorful reef fish. Diving at Hideaway Beach Resort & Spa offers a rare opportunity to encounter these creatures in their natural habitat, creating lifelong memories for guests.

Email: reservations@hideawaybeachmaldives.com / Call: +960 650-1515 / Website: www.hideawaybeachmaldives.com
Whether you’re exploring deep coral gardens, dramatic overhangs, or vibrant reef walls, each dive offers something new and exciting. The visibility in the Maldives is exceptional, often exceeding 30 meters, making it ideal for both underwater photography and general exploration.

Email: reservations@hideawaybeachmaldives.com / Call: +960 650-1515 / Website: www.hideawaybeachmaldives.com
Diving for All Levels
At Hideaway, we believe that everyone should have the opportunity to experience the thrill of diving. That’s why we cater to divers of all levels, from beginners to experienced professionals. Our professional dive center, led by expert instructors, offers a range of courses and guided dives. If you’re new to diving, you can start with an introductory course that will teach you the basics of scuba diving in a safe and controlled environment.

Email: reservations@hideawaybeachmaldives.com / Call: +960 650-1515 / Website: www.hideawaybeachmaldives.com
For more experienced divers, we offer advanced dive courses and guided excursions to some of the more challenging dive sites. Our instructors are knowledgeable and passionate about the local marine life, ensuring that every dive is not only safe but also informative and enjoyable.

Email: reservations@hideawaybeachmaldives.com / Call: +960 650-1515 / Website: www.hideawaybeachmaldives.com
Exclusive Diving Offer
To make your stay even more unforgettable, Hideaway is offering an exclusive diving package designed to enhance your experience both above and below the water. When you book a minimum 7-night stay, you’ll receive:
- 35% discount on room rates.
- Complimentary diving: 3 dives per person for 2 guests, allowing you to experience the beauty of the Maldives underwater world.
- Free meal plan upgrade: enjoy a complimentary upgrade from Bed & Breakfast to Half Board, or from Half Board to Full Board. Guests who prefer the White Platinum Plan (WPP) can avail it at a discounted rate.
This incredible offer provides the perfect opportunity to experience world-class diving while enjoying all the luxury and comfort that Hideaway Beach Resort & Spa is known for.

Email: reservations@hideawaybeachmaldives.com / Call: +960 650-1515 / Website: www.hideawaybeachmaldives.com
Combinable Offers for Even More Value
This diving offer can also be combined with our Anniversary and Honeymoon offers, allowing you to create the perfect celebration package. Whether you’re celebrating a milestone or simply seeking a romantic getaway, this offer ensures that you can enjoy the best of both worlds – luxurious accommodations and unforgettable diving adventures.

Email: reservations@hideawaybeachmaldives.com / Call: +960 650-1515 / Website: www.hideawaybeachmaldives.com
Terms & Conditions
- This offer is available exclusively for bookings made through the official Hideaway Beach Resort & Spa website using a specific booking code.
- The offer cannot be combined with other promotions available on the website or through other channels, nor can it be redeemed for cash.
- All dives are subject to weather conditions, ensuring the safety and enjoyment of all guests.
- Black-out dates: This offer is not available from 24th December 2024 to 9th January 2025.
To book this exquisite offer, use the Promo Code: SCUBA24FD

Email: reservations@hideawaybeachmaldives.com / Call: +960 650-1515 / Website: www.hideawaybeachmaldives.com
Hideaway is not just a resort; it’s a sanctuary for those seeking peace, adventure, and luxury. With spacious villas, private pools, and world-class dining options, the resort offers everything you need for a perfect holiday. From tennis, golf, gym, cycling to the exquisite underwater activities, unique dining options, Hideaway has something for everyone. And for diving enthusiasts, it provides an unparalleled opportunity to explore some of the most beautiful dive sites in the world.

Email: reservations@hideawaybeachmaldives.com / Call: +960 650-1515 / Website: www.hideawaybeachmaldives.com
Our dive center is fully equipped with state-of-the-art gear, ensuring that every dive is safe, comfortable, and enjoyable. Our instructors are passionate about the underwater world and are eager to share their knowledge with you, whether it’s your first dive or your 100th.

Email: reservations@hideawaybeachmaldives.com / Call: +960 650-1515 / Website: www.hideawaybeachmaldives.com
The Ultimate Dive Adventure Awaits
If you’re looking for an unforgettable diving holiday in the Maldives, look no further than Hideaway Beach Resort & Spa. With over 30 dive sites, unique marine life, and exclusive offers, we provide the ultimate underwater experience. Whether you’re celebrating a special occasion or simply seeking adventure, our diving package offers exceptional value and incredible memories.

Book now through our official website to take advantage of this exclusive offer and prepare for the dive adventure of a lifetime.
Email: reservations@hideawaybeachmaldives.com
Call: +960 650-1515
Website: www.hideawaybeachmaldives.com

-

 News1 month ago
Iconic SS United States to become the World’s Largest Artificial Reef
-

 Blogs3 months ago
NovoScuba’s Game-Changing Approach for Dive Store Owners: WE PAY YOU!
-

 News2 months ago
Book Review – 52 Assignments: Underwater Photography
-

 Gear News2 months ago
DYNAMICNORD – New German diving brand enters the British market
-

 News2 months ago
Exploring Cenote El Pit: A Diver’s Dream
-

 Gear News2 months ago
Try BARE drysuits (and maybe even win one!) this Friday with Sea & Sea at North West Dive Fest
-

 News3 months ago
Coming Soon – 52 Assignments
-

 News3 months ago
Save £200 per person per week at Pole Pole Lodge with Dive Worldwide


